


Figure 1: Air Compressor.
Air compressors enable the usage of pneumatic tools, which make DIY work a breeze. Compressors are also beginner-friendly, since assembling one is as simple as plugging in the hose and electrical cord. Monitor the pressure gauges to keep the air pressure in the hose below the amount listed on your power tool. Remember to adjust the pressure when you switch tools and release the drain valve when you're finished. Take these precautions every time to make your work safe and efficient.
1. Setting up the Compressor
1.1 Check the Pump Oil Level
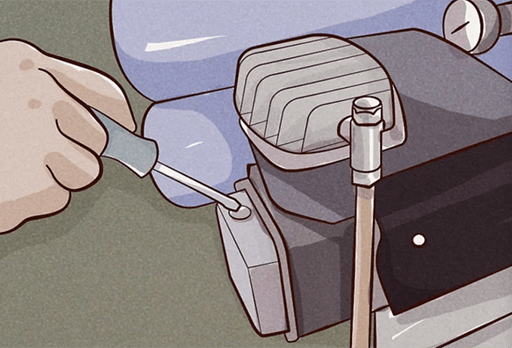
Figure 2: Check the Pump Oil Level.
If you need oil, it can be found at most home improvement, hardware, and auto parts stores.
If you’re unsure about what kind of compressor you have, consult the owner’s manual. Most small compressors are now oil-free, so that’s why you may not see an oil tank or dipstick.
1.2 Attach the Hose to the Regulator Valve

Figure 3: Attach the Hose to the Regulator Valve.
Set the compressor on flat ground. Find the regulator valve, which should be right next to the smaller pressure gauge on 1 end of the compressor. It’s a round, copper-colored, metal plug with a big hole in the middle. Push the pointed end of the hose into the valve to attach it.
1.3 Plug Your Power Tool into the Hose

Figure 4: Plug Your Power Tool into the Hose.
Hold the hose in 1 hand and the power tool in the other. Slide the tool’s plug into the hose’s free end and twist them together until the tool locks in place. When the tool is on securely, it won’t slide off.
1.4 Plug the Compressor into A Grounded 3-Prong Outlet
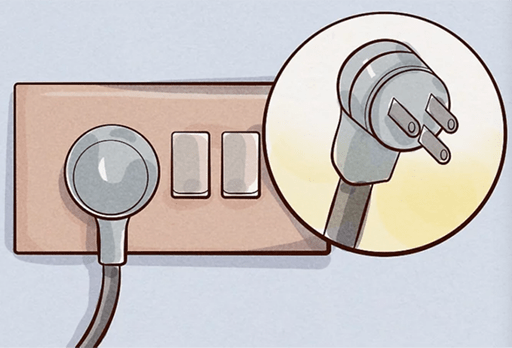
Figure 5: Plug the Compressor into A Grounded 3-Prong Outlet.
Make sure the compressor’s power switch is turned off before plugging it in. Avoid using extension cords if you can’t reach a working outlet. Instead, get another air hose and plug it into the first one.
To attach 2 hoses together, slide the plug end of 1 hose into the receiving end on the other hose. It works the same way as attaching a power tool to the hose. Extension cords aren’t recommended because they can cause the compressor to overheat.
2. Operating the Compressor
2.1 Put on Safety Goggles and Closed-toed Shoes

Figure 6: Put on Safety Goggles and Closed-toed Shoes.
This is important to do in order to operate power tools safety. Wear polycarbonate goggles to protect your eyes. A good pair of shoes or boots shields your toes from any dropped tools. Put on all your safety gear before attempting to operate the compressor.
Some tanks and tools can be pretty noisy, so consider wearing ear muffs as well.
Look for a copper-colored plug near the hose line. It will be tightly in place on the compressor and may have a ring that makes it easier to pull. Tug it towards you to release the valve and listen for the hiss of escaping air. Push the valve back in place before starting the compressor. Hearing air hiss out of the valve is a sign that it works.
2.2 Turn on the Compressor and Wait for the Tank to Pressurize

Figure 7: Turn on the Compressor and Wait for the Tank to Pressurize.
Flip the electrical switch on the tank to turn it on. The machine will buzz to life. Watch the larger pressure gauge on the tank's side. Wait for the needle to stop moving, signifying that the air inside has reached the maximum pressure.
The second, smaller gauge near the hose displays the air pressure in the hose. The display on that gauge won't move at all for the moment, which is fine.
2.3 Operate the Power Tool While Air is in the Tank
Once pressurized air is in the hose, your tool is ready for use. Every time you use the tool, the pressure in the tank will drop and begin refilling automatically. You won’t need to make adjustments until you switch to a different tool.
Related Info
How to Choose an Air CompressorDifferences between Single Mechanical Seals and Double Mechanical Seals
How to Replace Mechanical Seals in Centrifugal Pumps
What is A Mechanical Sealing
