


The solenoid valve coil is one of the important parts of the solenoid valve. Once there is a problem, it will seriously affect the normal use of the solenoid valve. Before introducing how to replace the damaged solenoid valve coil, we can first understand the reasons for the damage of the solenoid valve coil and how to judge/measure if the solenoid valve coil is bad.
1. Causes of Solenoid Valve Coil Failure and How to Tell
1.1 Causes of Solenoid Valve Coil Failure
1. Impure fluid medium, causing the valve core to be stuck and the coil to be damaged
If the medium itself is impure and there are some fine particles inside, after a period of use, the fine matter will adhere to the valve core.
When there is too little lubricating oil or too much impurities, the spool valve sleeve and the valve core will be stuck. When the valve core is stuck, the current will increase immediately, and the coil will easily burn out.
2. Coil dampness
The dampness of the coil will cause insulation degradation, magnetic leakage, and even coil burnout due to excessive current. During normal use, you need to pay attention to rain and moisture protection to prevent water from entering the valve body.
3. Power supply voltage higher than the rated voltage of the coil
If the power supply voltage is higher than the rated voltage of the coil, the main magnetic flux will increase, and the current in the coil will also increase. Besides, the core loss will cause the core temperature to rise, causing the coil to burn out.
4. Excessive operating frequency
Too frequent operation will also cause the coil to be damaged. In addition, if the core cross section is in an uneven operating state for a long time during operation, it will also cause the coil to be damaged.

5. Environment too hot
If the ambient temperature of the valve body is relatively high, it will also cause the coil temperature to rise, and the coil itself will also generate heat during operation.
It is generally difficult to tell whether the coil is bad or not with the naked eye, so how to judge? Let's learn together below.
1.2 How to Tell if a Solenoid Valve Coil Is Bad
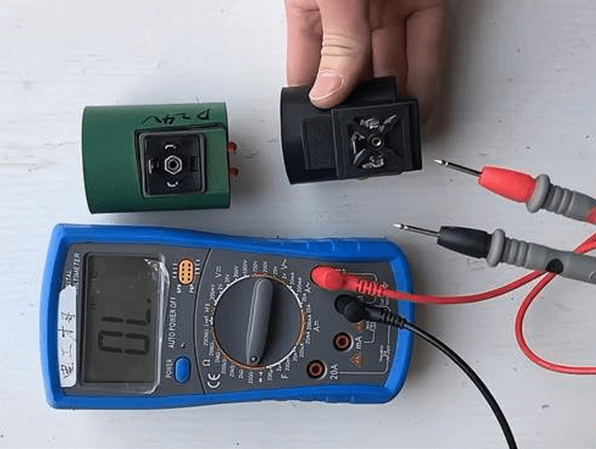
1. You can use a multimeter to measure the resistance of the coil. First connect the probes of the multimeter and the pins of the solenoid valve coil together, and then observe the value displayed on the multimeter display. If the value on the display exceeds the rated value, it means that the solenoid valve coil has aged.
2. If the value on the display is lower than the rated value, it means that there is a short circuit between the turns of the solenoid valve coil. If the value on the display is infinite, it means that the solenoid valve coil has an open circuit. All of the above phenomena mean that the solenoid valve coil has failed and needs to be replaced with a new one.
3. You can also put a small screwdriver beside the metal rod in the solenoid valve coil, and then energize the solenoid valve. If you can feel the magnetism around the small screwdriver, it means that the solenoid valve coil is good. If you can't feel the magnetism around the small screwdriver, it means that the solenoid valve coil is bad and needs to be replaced with a new one.
2. How to Replace the Solenoid Valve Coil: Replacement Solution for Universal Solenoid Valve Coils
The solenoid coil generates a magnetic field, which causes the plunger/spool to move inside the valve, thereby opening or closing the valve. When the solenoid coil is damaged, it is sometimes difficult to find the original one for replacement. Universal replacement coils may be the solution. The following are the most important factors you should consider when selecting a replacement coil.
2.1 Considerations for Solenoid Coil Replacement
1. Coil Hole Size
One of the most important parameters is the size of the coil hole (diameter D and height H).
2. Voltage (AC or DC)
AC stands for alternating current, while DC stands for direct current. AC is sometimes expressed in hertz (Hz) by the frequency of the voltage signal, such as 50Hz or 60Hz. Typical voltages of solenoid coils are 230V AC, 120V AC, 24V AC, 24V DC, or 12V DC.
3. Power (Watts)
Coil power is the amount of electrical energy consumed (used) on the solenoid valve, usually expressed in watts (W). Make sure the capacity of the replacement coil is approximately equal to or higher than that of the faulty one. For DC current, power is linearly related to voltage and amperage, as follows: P=V*I
For AC, this formula does not work because the voltage signal is a sinusoidal motion. The actual power can be determined by a correction factor, the so-called power factor. In practice, the actual power will be slightly lower than V*I.
4. Type of Connector
Solenoid valve coils are usually equipped with DIN connectors. The coil with pins can be connected to the female connector. DIN connectors have obvious advantages, such as good insulation, moisture resistance and quick connection.

5. IP Ratings
Most coils are equipped with DIN-A or DIN-B connectors (according to EN 175301-803), so if connected correctly, they have an IP65 rating.
2.2 Solenoid Coil Replacement Steps
Required Tools
The tools needed to replace the solenoid valve coil are: wrench, screwdriver, insulation tape, multimeter, a new coil, etc.
Detailed Steps for Replacing the Solenoid Coil:
1. Turn Off Power: Before starting, ensure that the power to the solenoid valve is turned off to prevent any electrical hazards.
2. Identify the Coil: Locate the solenoid valve coil on the valve body. It's typically a cylindrical component attached to the valve assembly.
3. Disconnect Wires: Carefully disconnect the wires connected to the coil. Note down the configuration or take a picture if needed for reassembly.
4. Remove the Old Coil: Depending on the type of valve, the coil may be held in place by screws, clips, or other fasteners. Unscrew or remove these to detach the old coil from the valve body.
5. Install the New Coil: Take the new solenoid valve coil and attach it to the valve body using the same method you used to remove the old one.
6. Connect Wires: Reconnect the wires to the new coil, ensuring they are securely attached and in the correct configuration.
7. Test the Valve: Once the new coil is installed and the wires are connected, you can turn the power back on and test the valve to ensure it functions properly.
8. Check for Leaks: After testing, check for any leaks around the valve to ensure proper installation.
9. Secure the Valve: If everything is working correctly, secure the valve in its original position, ensuring it is properly fastened and stable.
10. Final Checks: Double-check all connections and ensure the valve operates as expected before putting it back into service.

Notes:
1. Before replacing the solenoid valve coil, make sure that the circuit is powered off to avoid accidents.
2. Select a new coil according to the specifications and do not use a coil that does not match the solenoid valve.
3. When replacing the coil, strictly operate in accordance with the technical requirements to ensure that the solenoid valve can work normally after the coil replacement.
4. After replacement, use a multimeter to test whether the resistance of the solenoid valve coil meets the specifications, and perform a functional test to ensure that the device can work normally.
3. Conclusion
We believe that everyone has learned the basic knowledge and precautions of replacing the solenoid valve coil by reading the above text. When replacing, you must strictly follow the operating steps to ensure your own safety and proper work of the new coil.
If you're not comfortable with these steps or if the valve is part of a larger system, it may be best to consult a professional technician for assistance.
