


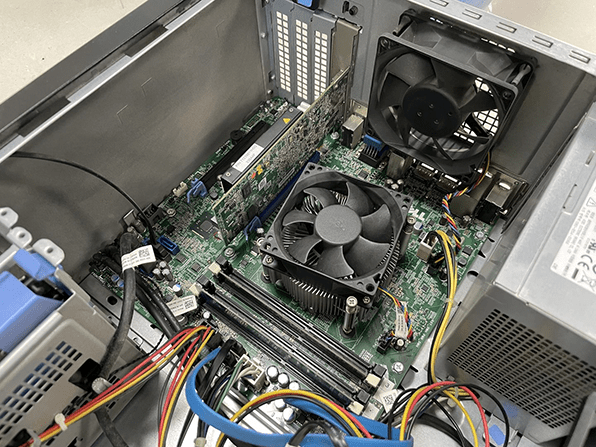
Figure 1: Inside the computer case.
With the advancement of technology, computers have become an indispensable tool in people's lives. A faulty cooling fan will affect the normal operation of the computer and
may even damage other hardware devices. In this case, it is necessary to replace the cooling fan of the computer
when it is bad. The next article introduces the detailed steps on how to replace the computer cooling fan, including
the replacement of desktop and notebook cooling fans.
This article aims to give you an idea of how computer fans are replaced. Replacing computer fans and other
components requires professionals or people with relevant experience to operate, and those who have no operating
experience are best not to do it by themselves.
1. Replacement of Desktop PC Case, CPU, or Power Supply Fans
Before explaining the replacement method, it is necessary to have a look at the common PC chassis structure so that you can quickly lock the position of the cooling fan that needs to be replaced. Or check your computer manual to know that.
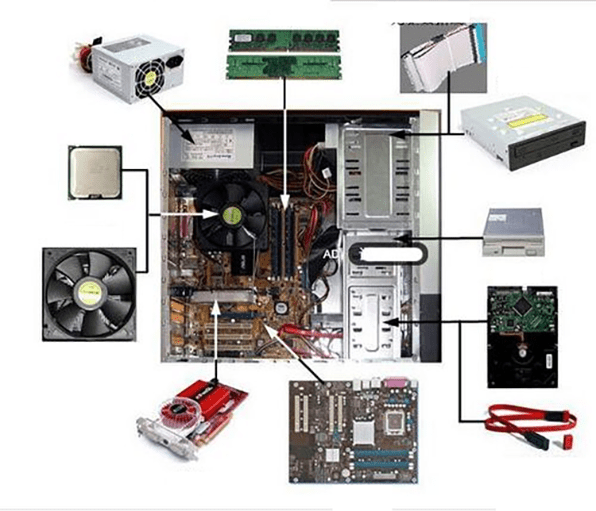
Figure 2: The internal structure diagram of the computer case.
1.1 How to Replace the Chassis Fan? (4 Steps)
The chassis fan is one of the common accessories in the computer. Its function is to remove the heat inside the chassis and keep the computer in good working condition. However, as the use time increases, the chassis fan will also fail or age, and we need to replace it at this time.

Figure 3: PC case fans on a desk.
Step 1: Preparations
First, power off the computer to avoid electric shock while replacing the case fan.
Next, prepare some simple tools, such as a Phillips screwdriver, flat-nose pliers, etc. If you are purchasing a
brand new case fan, you need to purchase a fan that matches the model of the current case, and at the same time
ensure that the size of the fan is compatible with the space inside the case.
Step 2: Disassemble the chassis panel and find the broken fan.
Step 3: Remove the original case fan
Use a Phillips screwdriver to remove the screws that fix the fan, and use flat-nose pliers to separate the
connecting wires from the fan.
Step 4: Replace the case fan with a new one
Place the new case fan in its place and secure it with screws. And insert the connecting wire correctly into the
power supply interface to ensure that the fan can work normally.
1.2 How to Replace the Computer CPU Cooling Fan? (6 Steps)
To replace the computer CPU fan, you need to pay attention to the following steps:
1. Turn off the power of the computer and unplug the power cord, then open the computer case and find where the CPU
fan is located.
2. Use a screwdriver to loosen the screws that fix the CPU fan, unplug the wires of the fan, and remove the fan. Be
careful to put the screws in a safe place so as not to lose them.

Figure 4: CPU Fan fixed with screws.
3. Use some thermal paste to coat the CPU to make sure the fan can dissipate heat well. Be careful not to apply too
much, otherwise it will affect the cooling effect of the CPU.
4. Install the new CPU fan to its original position, plug in the fan power cable and CPU fan control cable, make
sure they are firmly connected.
5. After making sure the new fan is installed and connected to the power supply, close the case cover and reconnect
the power cord.
6. Finally, turn on the power of the computer and open the monitoring software to ensure that the new CPU fan can
work normally and the temperature will not be too high.
It should be noted that when replacing the CPU fan, be sure to choose a fan that is suitable for your CPU model, and
make sure that the computer power supply has been turned off to avoid danger.

Figure 5: CPU fan and heat sink with retention clip.
1.3 How to Replace the Power Supply Cooling Fan? ( Steps)
The fan in the computer power supply will be damaged due to long-term use, dirt, and lack of oil. After damage, the
fan should be replaced in time.
1. Open the PC case and remove the computer power supply from the computer case.
2. Open the power supply shell, unscrew the screws fixing the power circuit board, and then unscrew the four screws
fixing the fan.
3. Unplug the wires from the broken fan, replace the fan with a new one, and connect it to the header.
4. Re-fix the fan and circuit board screws. Install the power supply unit back into the computer case.

Figure 6: PC power supply.
2. Replacement of Notebook CPU Fan with Detailed Steps (10 steps)
Laptops are an indispensable partner in our daily work and life, but with the increase in usage time, many problems will follow, such as the laptop CPU fan not turning. If the CPU fan does not turn, it will cause the CPU to overheat, and in severe cases, the computer may be burned. Therefore, it is very important to replace the CPU fan in time. The following will elaborate on how to replace the notebook CPU fan.
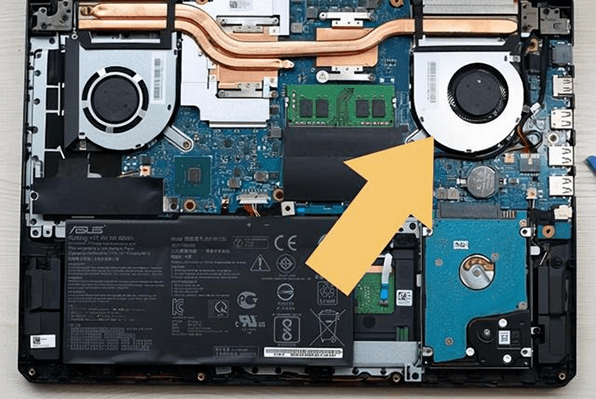
Figure 7: Laptop fan location.
1. Confirm the fan model
Before replacing the fan, you need to confirm the applicable fan model or laptop model. If you are not sure about
the model of the fan or the laptop, you can consult relevant information, such as the official manual of the laptop
to obtain the model of the fan, or consult a professional.
2. Buy the right CPU fan
After confirming the model of the CPU fan that needs to be replaced, you need to purchase a suitable CPU fan. It can
be purchased through the brand's official channels or third-party computer accessories stores, but it must be
purchased from authentic and credible merchants to avoid buying fake or low-quality products.
Note: When purchasing a CPU fan, you should choose the same or similar model as the current CPU fan, so as to ensure
compatibility and reduce problems during the replacement process.
3. Prepare tools
Before disassembling the laptop, you need to do the following preparations:
1) Appropriate tools, including a Phillips screwdriver, small flat-blade screwdriver, plastic card, etc., to allow
easy disassembly of the laptop.
2) There are several screws on the back of the computer to hold the fan. You will need a Phillips screwdriver to
loosen these screws.
3) A plastic card is used to insert into the gap between the top and bottom covers of the computer motherboard to
easily remove the bottom cover and access internal parts.
4. Shut down the computer and disconnect the power
Before replacing the fan, make sure the laptop is turned off and disconnected from the power source. Also, it is
recommended to remove the battery.
5. Open the bottom cover of the laptop
Opening the bottom cover of the laptop usually requires removal of screws. It should be noted that some notebook
computers have relatively dense internal components, and some components may need to be disassembled before
replacing the fan, so caution is required.
6. Remove the original fan
Remove the screws securing the fan. As can be seen from the figure below, each fan is fixed by 3 screws, which are
marked with yellow circles. Then unplug the fan plug, do not use too much force when pulling this out.
It is worth mentioning that the fan and the heat dissipation copper tube are stuck with black sealing tape, which is
to prevent the notebook computer from leaking air into the computer inside during the cooling process.

Figure 8: Laptop fan sealed with black tape.
7. Clean the fan area
After removing the fan, it is recommended to clean the dust and dirt in the fan area, which can improve the heat
dissipation efficiency and the life of the fan.
8. Install a new fan
Reinstall the screws securing the fan and connect the fan wiring properly.
9. Install the laptop cover
After reinstalling the new fan, replace the bottom cover of the laptop and reinstall the screws to ensure that the
cover is securely fixed.
10. Turn on the computer and test
With the power back on, turn on the computer and test that the new fan is working. If the fan works normally and
makes no noise, the replacement is successful.
Note that disassembling the laptop CPU fan requires some skills and experience. Especially for those who are not
familiar with assembly and disassembly, it is recommended to seek professional help to avoid more damage or injury.
